
Chapter 19: Storage Tuning and Durability
Performance and durability are the two sides of the same operational problem: the database must be fast, bounded, recoverable, and predictable under failure. This chapter starts with durability, backup, and maintenance practices, then covers memory and storage tuning.
1. Durability Model
Performance only matters if the data remains recoverable. Datalevin's storage engine (LMDB/DLMDB) is designed around copy-on-write commits and fast recovery after system crashes.
This section covers default LMDB durability, sync behavior, and flags that deliberately weaken the crash boundary.
1.1 Durability: The Power of Copy-on-Write (CoW)
Traditional databases such as PostgreSQL use a Write-Ahead Log (WAL) with an update-in-place storage strategy. If the system crashes before dirty pages are checkpointed, the database recovers by replaying the log before normal service resumes.
Datalevin's storage engine (LMDB) uses a Copy-on-Write (CoW) B+Tree.
- Never Overwrite: When you write a new datom, LMDB doesn't modify existing pages. Instead, it creates a new version of the affected pages.
- Atomic Visibility: The new pages do not become the current database state just because they have been written. They become visible only when LMDB publishes metadata that points to the new B+Tree root. Until that metadata update succeeds, readers and restart recovery still use the previous committed root.
- Durability Boundary: In the default durable mode, commit confirmation follows
pwritepage writes with the requiredfsynccalls so the new pages and the metadata that publishes the new root are safely on disk. The "atomic" part is the switch from the old committed root to the new committed root; the durability part is making the pages and metadata reach stable storage before the commit is reported as durable. - Instant Recovery: If new pages reach disk but power fails before the root metadata is updated, those pages are not part of the committed database. On restart, LMDB chooses the last valid committed root. The interrupted transaction is lost from the application's point of view, just as if it had never committed. The bytes for the unpublished pages may still be present in the file, but no committed root reaches them, so they are not queryable database state and may be overwritten or reused later. If the root metadata was updated and flushed successfully, the new version is the committed state. There is no long log-replay process for the direct LMDB file because recovery chooses between valid committed roots rather than repairing an in-place update.
1.2 Syncing to Disk
In standard mode (the default for local stores), the speed of your writes is primarily limited by the speed of synchronous storage flushes.
- Durable by default: On every transaction commit, direct LMDB writes changed pages with
pwriteand callsfsyncbefore reporting a durable commit. - Hardware Impact: On high-speed NVMe drives, this flush is very fast. On older magnetic drives or cloud-based block storage (like AWS EBS), it can be a major bottleneck.
1.3 Non-Durable Environment Flags
Chapter 20 shows the concrete LMDB environment flags for repeatable imports and cache rebuilds. From an operations perspective, the rule is simple: every flag that reduces commit-time flushing changes the crash boundary. :nometasync is the least aggressive option because database integrity is retained, though the last transaction may be lost. :nosync and :writemap/:mapasync trade much more safety for speed and can leave the database corrupted after an untimely system crash.
These warnings concern reduced-sync direct LMDB stores. In WAL mode, Datalevin supplies durability through the WAL profile and recovery path, as described in Section 2.
Use these modes only when the data can be rebuilt from a durable source or when the application has an explicit recovery plan. For raw KV stores, call the KV sync operation at explicit checkpoints if you need to force a flush. For the full flag table, setup examples, and ingestion trade-offs, see Chapter 20.
Non-durable flags change the crash boundary
Use reduced-sync LMDB modes only for rebuildable data, repeatable imports, temporary stores, or jobs with a separate source of truth. They are performance tools, not general production defaults for irreplaceable writes.
2. WAL Mode
While standard LMDB commits are durable by default, they can be limited by disk I/O. Datalevin's Write-Ahead Log (WAL) mode is an explicit opt-in for local embedded Datalog and KV stores, is required on the primary for non-HA async read replicas, and is forced on for consensus-lease HA. Use WAL when you need higher write throughput from concurrent callers, WAL replay, replication, or HA behavior.
The operational loop is: choose a durability profile, monitor LSN watermarks, optionally consume committed records with open-tx-log, create snapshots or checkpoints, and garbage-collect WAL segments that are no longer retained.
Each WAL directory belongs to one process. Datalevin 1.2.0 removed shared-WAL mode and the :wal-shared? option. If several application processes need the same WAL-backed database, connect them to one Datalevin server instead of opening its files directly in each process.
Persistent WAL environments add :writemap when opened without an explicit :flags option. This applies to KV and Datalog stores, embedded and remote, including reopening a store with WAL enabled in its persisted options. WAL also enables LMDB :nosync: acknowledgments follow the selected WAL durability profile, while checkpoints explicitly sync LMDB. These flags do not imply relaxed WAL durability.
To override the writable-map default, supply the complete flag set, such as #{:nordahead :notls} with open-kv, or under :kv-opts for a Datalog connection. WAL still manages LMDB syncing. Stores without WAL retain the ordinary LMDB defaults. Chapter 20, Section 1.4 covers automatic commit grouping for both durable direct LMDB and WAL writes.
2.1 Durability Profiles
WAL mode durability is specified with a database open-time option called durability profile.
:strict: The database waits for durable WAL acknowledgement for every transaction using the configured WAL sync mode. This is the default for new stores whenever WAL is enabled, including local embedded stores and consensus-lease HA.:relaxed: Transactions may return before the WAL is synced. Batched syncs can improve throughput but risk losing recent acknowledged work in a crash. It does not make the database corrupt after a crash: recovery opens a consistent database and replays durable WAL records, but the latest committed records that had not yet crossed the durability boundary may be absent. This is an explicit opt-in for local WAL; consensus-lease HA does not accept it.:extra: Uses even stricter durability guarantees, such asfcntl(F_FULLFSYNC)on macOS, to protect against hardware write-cache failures.
Start with :strict when you want higher throughput from concurrent writers while preserving durability. Datalevin can automatically group their commits for efficiency and still wait for durable storage before returning success. Synchronous idoc, full-text, vector, or embedding indexing prevents this grouping for Datalog writes, so measure with the search indexes your application needs. If you choose asynchronous indexing, use wait-for-secondary-index before a search that must include the latest writes.
Specify the profile in the same open-time options map that enables WAL. The following opens a local Datalog database with strict WAL durability:
(def conn
  (d/get-conn "/data/app-db"
              schema
              {:wal? true
               :wal-durability-profile :strict}))
try (Connection conn = Datalevin.getConn(
        "/data/app-db",
        schema,
        Map.of(":wal?", true,
               ":wal-durability-profile", ":strict"))) {
    // Use conn here.
}
with connect("/data/app-db",
             schema=schema,
             opts={":wal?": True,
                   ":wal-durability-profile": ":strict"}) as conn:
    # Use conn here.
    pass
const conn = await connect("/data/app-db", {
  schema,
  opts: {
    ":wal?": true,
    ":wal-durability-profile": ":strict"
  }
});

try {
  // Use conn here.
} finally {
  await conn.close();
}
Use the same option keys with open-kv / openKV / open_kv / openKv for raw KV stores. For a new store, WAL uses :strict when no profile is specified. Select :relaxed explicitly only when the workload accepts a short crash-loss window for higher throughput, or select :extra when the platform-specific stronger flush is required.
An existing WAL database retains its persisted durability profile when it is reopened. To move a database created under the earlier :relaxed default to :strict, reopen it with :wal-durability-profile :strict explicitly.
2.2 The LSN Lifecycle
In WAL mode, every transaction is assigned a Log Sequence Number (LSN). LSNs are positive, strictly increasing commit positions in the WAL stream. They are the unit Datalevin uses for durability tracking, recovery replay, snapshots, replication, and WAL garbage collection.
Figure 19.1 should be read from left to right. A transaction first becomes committed when Datalevin accepts it into the WAL commit stream and assigns an LSN. It becomes durable when the WAL record containing that LSN has reached the durability boundary selected by the current profile. It becomes applied when Datalevin knows the corresponding state is present in the LMDB file or covered by recovery-marker state. Later, create-snapshot! records a checkpoint that covers applied state, and gc-txlog-segments! can reclaim WAL segments that are older than all retention floors.
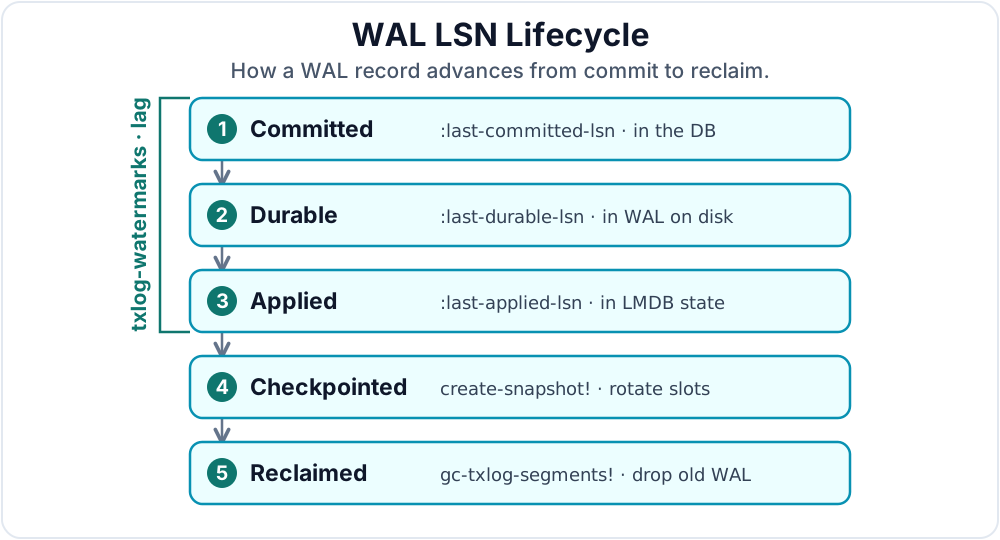
Each watermark answers a different operational question. Has Datalevin accepted the transaction into the WAL stream? Has the WAL record reached storage under the selected durability policy? Has the LMDB file or recovery-marker state caught up to that record? Under :relaxed group commit, a transaction can be committed before it is durable. A durable transaction can also be ahead of the applied marker until checkpoint work catches up. This is normal operational lag, not logical inconsistency: committed data is visible according to the transaction semantics of the open database, durable data survives the crash boundary, and unapplied durable WAL can be replayed during recovery.
Committed, durable, and applied are different
WAL watermarks let operators distinguish visible committed work from work that has crossed the selected durability boundary and work already reflected in LMDB checkpoint state. Lag between those positions can be normal, especially under relaxed group commit.
:last-committed-lsn: The latest transaction that has been successfully committed in the database.:last-durable-lsn: The latest transaction that has reached the WAL durability boundary selected by the current profile and sync mode.:last-applied-lsn: The latest transaction known to be applied to the LMDB state or covered by recovery marker state.
By monitoring these watermarks with txlog-watermarks, you can precisely track the "lag" between application commits and physical disk durability.
In Clojure, call txlog-watermarks on the local KV handle. For a Datalog connection, use datalog-kv to get the backing KV handle. The Java, Python, and JavaScript Datalog bindings expose this as a connection-level operation, and call through to the connection's backing store internally:
(def conn
  (d/get-conn "/data/app-db" schema {:wal? true}))

(d/transact! conn [{:db/id -1 :event/name "started"}])

(-> (d/txlog-watermarks (d/datalog-kv conn))
    (select-keys [:wal?
                  :durability-profile
                  :last-committed-lsn
                  :last-durable-lsn
                  :last-applied-lsn]))
;; => {:wal? true
;;     :durability-profile :strict
;;     :last-committed-lsn 1
;;     :last-durable-lsn 1
;;     :last-applied-lsn 1}
try (Connection conn = Datalevin.getConn(
        "/data/app-db",
        schema,
        Map.of(":wal?", true))) {
    conn.transact(List.of(
        Map.of(":db/id", -1L, ":event/name", "started")));

    Map<?, ?> watermarks = conn.txLogWatermarks();
    // Inspect :last-committed-lsn, :last-durable-lsn, and :last-applied-lsn.
}
from datalevin import connect, tx

with connect("/data/app-db",
             schema=schema,
             opts={":wal?": True}) as conn:
    conn.transact(tx.data(tx.entity(-1, {"event/name": "started"})))

    watermarks = conn.tx_log_watermarks()
    lsn_view = {
        key: watermarks[key]
        for key in [
            ":last-committed-lsn",
            ":last-durable-lsn",
            ":last-applied-lsn",
        ]
    }
import { connect, tx } from "datalevin-node";

const conn = await connect("/data/app-db", {
  schema,
  opts: { ":wal?": true }
});

try {
  await conn.transact(tx.data(
    tx.entity(-1, { "event/name": "started" })
  ));

  const watermarks = await conn.txLogWatermarks();
  const lsnView = {
    committed: watermarks[":last-committed-lsn"] ?? watermarks.lastCommittedLsn,
    durable: watermarks[":last-durable-lsn"] ?? watermarks.lastDurableLsn,
    applied: watermarks[":last-applied-lsn"] ?? watermarks.lastAppliedLsn
  };
} finally {
  await conn.close();
}
If :last-committed-lsn is ahead of :last-durable-lsn, the WAL has accepted transactions that have not yet reached the selected durability boundary. If :last-durable-lsn is ahead of :last-applied-lsn, durable WAL records exist that are not yet covered by the LMDB applied marker used for recovery. Under :strict, the committed-to-durable gap is usually small or zero in steady state. Under :relaxed, short committed-to-durable lag is expected during group commit. The durable-to-applied gap is reported as :durable-applied-lag-lsn and :checkpoint-stale? in txlog-watermarks; it is controlled by LMDB checkpoint cadence (:lmdb-sync-interval-ms / :lmdb-sync-interval and :wal-checkpoint-stale-threshold-ms), not by the durability profile alone. These checkpoint options are explained in Section 2.4 and summarized in Appendix F.
On startup, a WAL-enabled store compares the LSN applied to the LMDB file with the durable LSN in the log. If the log is ahead, Datalevin validates newer log records and replays them into the LMDB environment before opening the database for normal reads and writes.
2.3 Reading Committed Transactions
Use open-tx-log when you need to consume committed WAL records, for example to build an audit export, a change-capture process, or an external replication bridge. The function reads records by LSN. The lower bound is inclusive, and the optional upper bound makes catch-up batches explicit:
;; Read committed records from LSN 5000 onward.
(d/open-tx-log kv 5000)

;; Read a bounded inclusive range.
(d/open-tx-log kv 5000 5999)
// Read committed records from LSN 5000 onward.
var records = kv.openTxLog(5000L);

// Read a bounded inclusive range.
var batch = kv.openTxLog(5000L, 5999L);
# Read committed records from LSN 5000 onward.
records = kv.open_tx_log(5000)

# Read a bounded inclusive range.
batch = kv.open_tx_log(5000, upto_lsn=5999)
// Read committed records from LSN 5000 onward.
const records = await kv.openTxLog(5000);

// Read a bounded inclusive range.
const batch = await kv.openTxLog(5000, { uptoLsn: 5999 });
Each returned record includes its :lsn and an :ops collection containing the KV operations recorded for that committed transaction. A consumer should store the last processed LSN in its own state and resume from the next LSN on restart. If crash-surviving audit output matters, compare progress with txlog-watermarks and treat records at or below :last-durable-lsn as the durable boundary.
Retention matters for long-running consumers. gc-txlog-segments! may remove old segments after snapshots, replicas, vector checkpoints, backup pins, and operator retention floors no longer require them. If a consumer may lag, run GC with an explicit retain floor, such as (d/gc-txlog-segments! kv next-lsn), or use deployment-level retention policy so the consumer's next unread LSN remains available.
2.4 Snapshots and Checkpoints
WAL mode introduces checkpoint, snapshot, and retention maintenance. Checkpoints are LMDB environment syncs. Use force-lmdb-sync! to force one immediately, and use :lmdb-sync-interval-ms or :lmdb-sync-interval in seconds to set the regular cadence. :wal-checkpoint-stale-threshold-ms sets the age at which txlog-watermarks reports :checkpoint-stale?; by default, Datalevin uses twice the sync interval.
Datalevin can run snapshot creation from its built-in scheduler when the WAL-enabled store is opened with :snapshot-scheduler? true; otherwise, create-snapshot! remains available for explicit operator-controlled snapshots.
When the snapshot scheduler is enabled, Datalevin creates snapshots automatically according to :snapshot-interval-ms, :snapshot-max-lsn-delta, :snapshot-max-log-bytes-delta, and :snapshot-max-age-ms. Calling create-snapshot! manually is for an on-demand snapshot or for deployments that choose to run their own scheduler.
Snapshot creation forces the WAL and LMDB state to disk, copies the LMDB environment into the current snapshot slot, rotates the previous current snapshot into the previous slot, and advances snapshot-floor bookkeeping used by WAL retention. WAL maintenance helpers are available directly on local KV handles and Datalog connections:
(def kv
  (d/open-kv "/data/app-kv"
             {:wal? true
              :snapshot-scheduler? true}))

(d/txlog-watermarks kv)
(d/list-snapshots kv)

;; Optional: force an on-demand snapshot now.
(d/create-snapshot! kv)
import datalevin.*;
import java.util.Map;

try (KV kv = Datalevin.openKV("/data/app-kv",
         Map.of(":wal?", true, ":snapshot-scheduler?", true))) {
    kv.txLogWatermarks();
    kv.listSnapshots();

    // Optional: force an on-demand snapshot now.
    kv.createSnapshot();
}
from datalevin import open_kv

with open_kv("/data/app-kv",
             opts={":wal?": True, ":snapshot-scheduler?": True}) as kv:
    kv.tx_log_watermarks()
    kv.list_snapshots()

    # Optional: force an on-demand snapshot now.
    kv.create_snapshot()
import { openKv } from "datalevin-node";

const kv = await openKv("/data/app-kv", {
  ":wal?": true,
  ":snapshot-scheduler?": true
});

try {
  await kv.txLogWatermarks();
  await kv.listSnapshots();

  // Optional: force an on-demand snapshot now.
  await kv.createSnapshot();
} finally {
  await kv.close();
}
2.5 WAL Segment Garbage Collection
Use gc-txlog-segments! to reclaim disk space by deleting old WAL segments that are no longer needed by snapshots, replicas, vector checkpoints, or operator retention pins. Datalevin respects the :wal-retention-bytes and :wal-retention-ms policies, but deletion happens when this cleanup operation runs.
;; Reclaim disk space.
(d/gc-txlog-segments! kv)

;; Keep WAL records from LSN 5000 onward.
(d/gc-txlog-segments! kv 5000)
// Reclaim disk space.
kv.gcTxLogSegments();

// Keep WAL records from LSN 5000 onward.
kv.gcTxLogSegments(5000L);
# Reclaim disk space.
kv.gc_tx_log_segments()

# Keep WAL records from LSN 5000 onward.
kv.gc_tx_log_segments(retain_floor_lsn=5000)
// Reclaim disk space.
await kv.gcTxLogSegments();

// Keep WAL records from LSN 5000 onward.
await kv.gcTxLogSegments({ retainFloorLsn: 5000 });
WAL snapshots bound recovery and retention inside a store.
Snapshots are not backup copies
WAL snapshots help one store recover and decide which WAL segments can be retained or collected. They do not replace independent backup copies, off-site retention, or restore drills.
3. Backup and Maintenance
This section covers online copies, compaction, command-line maintenance, logical dump/load, and re-indexing.
3.1 Online Backup Copies: d/copy
In other databases, backing up a live database can be tricky. If you simply copy the file while a write is happening, the copy might be corrupted.
Datalevin's d/copy function creates a transactionally consistent backup copy from a Datalog connection or DB object, or from a KV handle. This is the ordinary online backup path: use it when you want a recoverable point-in-time copy of the current database without changing the source. It can run while the database is active. Readers can continue using the source, and writers do not have to stop for the copy to be consistent.
This section is about the default, non-compacting copy. It preserves the database content and layout closely enough for fast backup creation. If the goal is to reclaim free pages after large deletes or to rewrite the destination into a smaller file, use the compacting form in Section 3.2.
;; Copy a live Datalog database from a connection
(d/copy (d/db conn) "/path/to/backup-db")

;; Copy a raw KV store
(d/copy kv "/path/to/backup-kv")
import datalevin.*;

try (Connection conn = Datalevin.getConn("/data/app-db", schema)) {
    conn.copy("/path/to/backup-db");
}

try (KV kv = Datalevin.openKV("/data/app-kv")) {
    kv.copy("/path/to/backup-kv");
}
from datalevin import connect, open_kv

with connect("/data/app-db", schema=schema) as conn:
    conn.copy("/path/to/backup-db")

with open_kv("/data/app-kv") as kv:
    kv.copy("/path/to/backup-kv")
import { connect, openKv } from "datalevin-node";

const conn = await connect("/data/app-db", { schema });
try {
  await conn.copy("/path/to/backup-db");
} finally {
  await conn.close();
}

const kv = await openKv("/data/app-kv");
try {
  await kv.copy("/path/to/backup-kv");
} finally {
  await kv.close();
}
The same operation is available from the command line:
$ dtlv -d /data/companydb copy /backup/companydb-2026-01-15
- Backup purpose: Use ordinary
copyfor routine online backup when the destination does not need compaction. - Consistency: The copy represents a single transactionally consistent point in time.
- Operational impact: LMDB's MVCC architecture lets the copy run while the source remains available. A long-running copy still consumes I/O and can keep older pages live until it finishes, so schedule large copies deliberately.
3.2 Compacting with d/copy
The compacting form of copy uses the same consistency guarantees as Section 3.1, but it serves a different maintenance purpose. LMDB reuses deleted pages inside the source file; it does not shrink the file in place. A compacting copy rewrites live pages into a new destination, leaving free pages behind in the source. Use it after large deletes, after major data reshaping, or before archiving a smaller backup artifact.
;; Copy and compact a Datalog database
(d/copy (d/db conn) "/path/to/compact-backup-db" true)

;; Copy and compact a raw KV store
(d/copy kv "/path/to/compact-backup-kv" true)
// Copy and compact a Datalog database
conn.copy("/path/to/compact-backup-db", true);

// Copy and compact a raw KV store
kv.copy("/path/to/compact-backup-kv", true);
# Copy and compact a Datalog database
conn.copy("/path/to/compact-backup-db", True)

# Copy and compact a raw KV store
kv.copy("/path/to/compact-backup-kv", True)
// Copy and compact a Datalog database
await conn.copy("/path/to/compact-backup-db", { compact: true });

// Copy and compact a raw KV store
await kv.copy("/path/to/compact-backup-kv", { compact: true });
The command-line form uses -c:
$ dtlv -d /data/companydb -c copy /backup/companydb-compact
Compaction is not an in-place operation. It creates a new compacted destination. If you want the compacted copy to replace the production database, treat that as a controlled maintenance step: stop writers, close the old connection, move or restore the compacted directory into place, and reopen.
3.3 The dtlv Command-Line Tool
The dtlv CLI tool is the operator entry point for maintenance tasks. Use it when a backup, compaction, dump/load, or inspection task belongs in a shell script or runbook rather than in application code. The command-specific help is usually the best reference while operating a system:
$ dtlv help
$ dtlv help copy
$ dtlv help dump
$ dtlv help load

# View database statistics
$ dtlv -d /data/companydb stat
The examples above this section showed dtlv copy for backup and dtlv -c copy for compaction. The next section covers dtlv dump and dtlv load.
3.4 Dump and Load Formats
Dump/load is a logical export/import path. Use it when you need a portable data file, a version-independent migration path, or a way to move data into a new database directory. For routine same-version backups, copy is usually simpler and faster.
Datalevin supports two dump/load encodings:
- EDN (default): Human-readable, version-independent text.
- Nippy: Binary serialization for faster dump/load of large databases.
For a Datalog database, pass -g / --datalog:
# EDN Datalog dump/load
$ dtlv -d /data/companydb -g -f ~/company.edn dump
$ dtlv -d /data/newdb -g -f ~/company.edn load

# Nippy Datalog dump/load
$ dtlv -d /data/companydb -g -n -f ~/company.nippy dump
$ dtlv -d /data/newdb -g -n -f ~/company.nippy load
For a named KV sub-database, omit -g and pass the DBI name to dump or load:
# EDN dump/load for a named KV DBI
$ dtlv -d /data/companydb -f ~/sales.edn dump sales
$ dtlv -d /data/newdb -f ~/sales.edn load sales
Use -n / --nippy when speed and file size matter more than human inspectability. Keep EDN when the dump needs to be reviewed, transformed, or stored as a long-lived interchange artifact.
Both text and binary dumps preserve custom type definitions and the payloads needed to read custom entries. Dumping and restoring the stored bytes does not require application function bindings; reading custom values after restore does. Prefer an empty destination when transferring a custom store. When restoring into an existing store, Datalevin rejects conflicting type definitions, payloads, or DBI contents. Chapter 10, Section 3.4 and Appendix F, Section 12 cover custom types.
3.5 Database Upgrades
To upgrade to 1.2.0, open your existing database with the new version. Datalevin automatically migrates databases from version 0.9.27 onward, including Datalog, KV, and mixed Datalog/KV stores. No manual dump/load step is needed.
The 1.2.0 upgrade includes DLMDB data format version 2. Databases using the older native format must be rebuilt; automatic migration performs this through the released runtime matching the source database version. A filesystem or compact copy preserves the source format and does not convert it.
For an unpublished development database containing features its matching release cannot read, dump with that development build and its old native library before upgrading, then load into a new directory with the new runtime. Manual dump/load is also required when changing the native dependency's data format without changing Datalevin's major/minor version, since automatic migration is triggered by Datalevin's version. Validate the restored data and retain the original directory before switching the application.
Keep a backup and try the upgrade on a copy before switching production. The first open may take longer while Datalevin upgrades the data. Allow internet access so it can download the previous version if needed for the upgrade. Afterward, check that your application can read and update its data.
In general, Datalevin only supports newer versions opening databases created or previously opened by older versions. The reverse is not supported. For example, if a database has been opened by Datalevin 0.10.18, it may not be possible to open that database again with Datalevin 0.10.5.
Manual migration: For older databases, use the command-line tool:
# 1. Backup and compact with old version
$ dtlv-0.4 -d /src/dir -c copy /backup/dir

# 2. Dump with old version
$ dtlv-0.4 -d /src/dir -g -f dump.edn dump

# 3. Load with new version
$ dtlv -d /dest/dir -f dump.edn -g load
3.6 Re-Indexing
Datalevin provides a re-index function that dumps and reloads data to rebuild indexes. This can be useful in recovery scenarios, when changing index options, or when index structures need to be rebuilt. It is only safe when no other thread or process is accessing the same database.
Re-indexing is exclusive maintenance
Schedule re-indexing as an operator task on the host that owns the files. Close other connections and stop server access first; rebuilding indexes while another process uses the same database is not a live online operation.
Choose the existing-schema form or the updated-schema form below for your maintenance task:
;; Re-index a Datalog connection with existing schema/options
(def reindexed-conn (d/re-index conn {}))

;; Re-index with an updated schema and options
(def reindexed-conn
  (d/re-index conn new-schema {:backup? true}))
// Re-index with existing schema/options
conn.reIndex();

// Or supply an updated schema and retain a backup
conn.reIndex(newSchema, java.util.Map.of(":backup?", true));
# Re-index with existing schema/options
conn.re_index()

# Or supply an updated schema and retain a backup
conn.re_index({":backup?": True}, schema=new_schema)
// Re-index with existing schema/options
await conn.reIndex();

// Or supply an updated schema and retain a backup
await conn.reIndex({ ":backup?": true }, { schema: newSchema });
In Clojure, use the connection returned by re-index for subsequent work. The Java, Python, and JavaScript methods update their connection wrapper and return that same wrapper. Close the resulting connection when maintenance is complete.
KV stores and standalone search engines expose corresponding re-index operations. Client/server users should schedule re-indexing as an operator task on the host that owns the local database files.
4. Durability and Maintenance Checklist
For recoverable operations, follow this checklist:
- Choose the right write mode: Use default LMDB commits for simple local durability; enable WAL when you need WAL throughput, replay, replication, or HA.
- Use WAL snapshots: Enable
:snapshot-scheduler? true, or run your own scheduledcreate-snapshot!, so WAL/LMDB state is checkpointed and snapshot slots are rotated. - Track
open-tx-logconsumers: If you useopen-tx-log, persist each consumer's next LSN and keep retention floors ahead of garbage collection. - Run
gc-txlog-segments!: Reclaim disk space regularly. - Monitor disk space: LMDB and WAL need enough free space to perform their operations.
- Automate
d/copyordtlv copy: Run a daily or hourly backup copy and move the result to an off-site location (e.g., AWS S3). - Test your restores: Regularly practice restoring from a backup copy; if using WAL, verify recovery and replay behavior.
- Use NVMe for speed: The durability of your database is directly tied to the IOPS and latency of your disk.
- Compact periodically: Use
d/copywithtrueas the third argument, ordtlv -c copy, to reclaim disk space in a destination copy after large deletions. - Plan upgrades: When upgrading Datalevin versions, use dump/load for databases older than 0.9.27.
The next operational concern is sizing the local store so these durability and maintenance choices remain predictable under production load.
5. Memory Layout and Storage Tuning
Datalevin is a "zero-copy" database, which means its memory management is very different from an ordinary application that keeps its working data as managed runtime objects. As discussed in the preface and Chapter 4, Datalevin is layered: native LMDB storage, a JVM bridge, database semantics, and host APIs. When this section mentions runtime garbage collection, it is talking about Datalevin's runtime heap, not a requirement on the application implementation language. The important point is that the database pages themselves are file-backed pages managed by the operating system, not objects managed by Datalevin's runtime heap.
This section covers practical defaults for tuning Datalevin's memory and storage parameters for stable production performance.
5.1 The LMDB Map: :mapsize
The most critical parameter for Datalevin is :mapsize. This is the OS-allocated size for the memory-mapped database file, which defines the maximum size the file can grow to in the address space.
5.2 Virtual Memory vs. Resident Memory
Unlike a traditional managed application heap, the :mapsize is a virtual memory reservation, as shown in Figure 19.2. Setting a 1TB mapsize does not mean the database will consume 1TB of RAM. It simply means the OS will reserve a 1TB "address space" for the database file.
The practical ceiling is the process's usable virtual address space, which is CPU- and OS-dependent. For example, many modern 64-bit systems implement 48-bit virtual addresses and give a user process about 128 TiB of address space. Keep :mapsize comfortably below that ceiling and leave room for other memory mappings in the process.
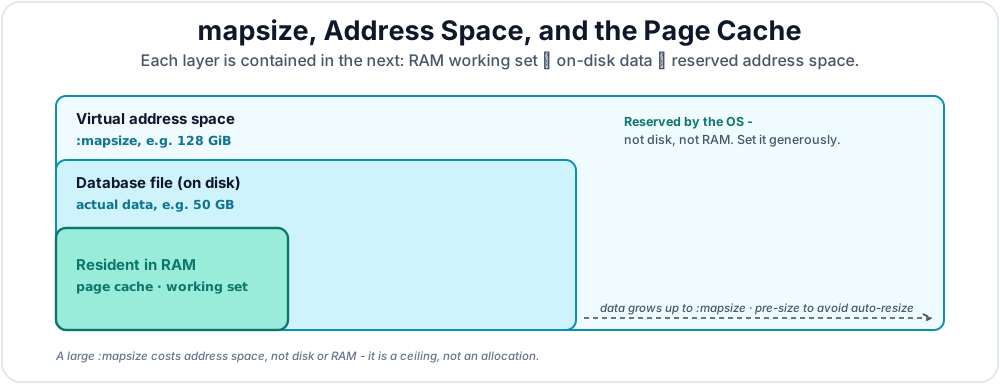
- Recommendation: Set
:mapsizeto be significantly larger than your expected data size. For example, if you expect 50 GiB of data, reserving 256 GiB gives room for growth and large transactions. - Default: The default initial mapsize is 1000 MiB and grows automatically. For production, set a larger value upfront when growth is predictable.
;; Set mapsize to 128 GiB (in MiB)
(d/get-conn path schema {:kv-opts {:mapsize 131072}})
// Set mapsize to 128 GiB (in MiB)
Connection conn = Datalevin.getConn(path, schema,
    Map.of(":kv-opts", Map.of(":mapsize", 131072)));
# Set mapsize to 128 GiB (in MiB)
conn = connect(path, schema=schema,
               opts={":kv-opts": {":mapsize": 131072}})
// Set mapsize to 128 GiB (in MiB)
const conn = await connect(path, {
  schema,
  opts: { ":kv-opts": { ":mapsize": 131072 } }
});
Set mapsize before production growth
Datalevin can automatically grow the mapsize if it runs out of space, but that resize is expensive and causes a performance spike. Set an appropriately large mapsize up front when production growth is predictable.
Chapter 22 explains how this internal resize path differs from application-level transaction failures such as validation, lookup-ref, unique, and CAS errors.
5.3 Leveraging the OS Page Cache
Because Datalevin uses memory-mapped files (mmap), it does not manage its own buffer pool. Instead, it relies on the Operating System Page Cache. Here "page cache" means the operating system's cache of file-backed pages in main memory, not CPU L1/L2/L3 hardware caches. Operationally, a Datalevin database path names a directory, but the durable LMDB pages normally live in one memory-mapped data file, data.mdb. The directory may also contain LMDB's lock/readers file (lock.mdb) and Datalevin-managed WAL or snapshot files when those features are enabled. Named DBIs are logical key-value spaces inside the same LMDB data file; they are not separate data files.
- Zero-copy reads: When you perform a read, the OS handles fetching the required pages from disk into the page cache. LMDB maps those pages into the Datalevin process. The native layer hands the address of the LMDB value memory to Java as a
DirectByteBuffer, and Datalevin's Clojure runtime decodes from that buffer into typed values without first copying the bytes into a JVM heap byte array. - Database pages outside the runtime heap: Because the database pages live in the page cache, they are outside Datalevin's JVM-managed heap. A query still allocates normal runtime objects for decoded values and result collections, but the resident database pages themselves do not become managed objects and do not create proportional GC pressure. This lets Datalevin work with datasets much larger than the runtime heap when the active working set fits the available memory.
RAM should fit the active working set
Datalevin's effective buffer pool is the operating system page cache. For steady read performance, leave enough RAM for the pages your workload touches repeatedly, not for the full virtual mapsize.
5.4 Monitoring Page Cache Usage
There is no Datalevin buffer-pool hit ratio to watch, because Datalevin does not own the buffer pool. The useful signals come from the operating system: whether the LMDB data file is resident, whether queries cause major page faults, whether the machine is swapping, and whether reads are blocked on storage.
On Linux, start with the host-level view:
# Overall memory. Watch "available" and "buff/cache".
$ free -h

# Swap and I/O pressure. Sustained si/so or high wa is a warning sign.
$ vmstat 1
Then look at the Datalevin process:
# VSZ can be large because of :mapsize. RSS is resident memory.
$ ps -o pid,vsz,rss,maj_flt,comm -p "$DATALEVIN_PID"

# Per-process page faults. Sustained majflt/s under normal queries means the
# active working set is not staying resident in RAM.
$ pidstat -r -p "$DATALEVIN_PID" 1
If the Linux fincore tool is available, inspect the LMDB data file directly:
# Show how much of the mapped data file is currently in the page cache.
$ fincore /data/companydb/data.mdb
The interpretation is more important than any single number. A large virtual size is expected when :mapsize is large, and by itself is not a problem. A healthy steady-state read workload should show enough available memory, little or no swap activity, low sustained majflt/s, and low disk read pressure after the working set has warmed. If major faults and disk reads remain high during ordinary repeated queries, the hot working set is larger than available RAM or other processes are evicting Datalevin's file-backed pages.
On macOS, the built-in tools are less direct, but the same logic applies:
$ vm_stat 1
$ memory_pressure
Watch page-ins, swap activity, and memory pressure while running representative queries. For an exact per-file residency check on either Linux or macOS, use a tool such as vmtouch when it is available:
$ vmtouch /data/companydb/data.mdb
5.5 Reader Threads and Locking: :max-readers
LMDB uses a "lock-free" reader model, but it still needs to track active readers to prevent writers from overwriting pages that are still being read.
:max-readers: This parameter (default: 1024) defines how many concurrent reader slots can access the database.- When to Increase: If your application uses highly concurrent web servers or bounded worker pools above the default reader count, increase this before deployment.
Datalevin also tracks cached reader transactions and the owning thread so reader slots can be released when threads disappear. This reduces the common LMDB failure mode where abandoned thread pools exhaust reader slots. Virtual-thread handling is hardened by disabling thread-local read reuse for short-lived virtual threads, the lightweight JVM threads.
(d/get-conn path schema {:kv-opts {:max-readers 512}})
Connection conn = Datalevin.getConn(path, schema,
    Map.of(":kv-opts", Map.of(":max-readers", 512)));
conn = connect(path, schema=schema,
               opts={":kv-opts": {":max-readers": 512}})
const conn = await connect(path, {
  schema,
  opts: { ":kv-opts": { ":max-readers": 512 } }
});
5.6 Storage Efficiency: Prefix Compression
Datalevin's storage engine (DLMDB) uses prefix compression to minimize the on-disk footprint of your indexes.
Prefix compression is most effective when a large portion of neighboring encoded keys is identical. Some KV workloads with long structured keys can therefore see large savings. Datalevin's Datalog indexes also benefit, but the effect is more modest than the largest KV cases because the shared part is usually a portion of the encoded 8-byte entity id in EAV and a portion of the encoded 4-byte attribute id in AVE. The DUPSORT nesting described in Chapter 15 is the main reason Datalog indexes avoid repeating full entity ids or full (A, V) prefixes.
- Reduces storage size: Workload dependent; high reductions are possible when key prefixes are substantial, while Datalog index savings are usually smaller because their common prefixes are compact encoded ids.
- Improves cache locality: More keys fit into memory pages and processor caches, which can make index scans faster.
6. Tuning Checklist
When deploying Datalevin to production, follow this checklist:
- Set a large
:mapsize: Reserve enough virtual address space for your future growth. - Monitor Page Cache usage: Ensure your server has enough RAM to keep your working set in memory.
- Adjust
:max-readers: If you have a high-concurrency application, increase the reader limit. - Account for disk growth: Leave room for LMDB free pages, compacted copies, snapshots, and WAL retention if WAL mode is enabled.
By tuning these parameters, you give Datalevin's zero-copy architecture the address space, page-cache headroom, reader slots, and disk space it needs to remain predictable as datasets grow.
Together with the durability and maintenance checklist in Section 4, this closes the chapter's two operational concerns: recoverable writes and predictable local storage.
User Examples
Log in to create examplesNo examples for this chapter yet.